# 自定义技能设备端实现说明
# 设备端自定义技能实现逻辑
iFLYOS 云端获取上传的语义或文本请求后进行语义理解和识别,前置拦截器拦截自定义技能语料并下发自定义指令。iFLYOS 云端下发:
{"iflyos_meta": {
	"is_last": true,
	"trace_id": "86e626e3a9a807d20bde1f66b97cf6cc",
	"request_id": "manual_4b0ff606-3f95-416a-b26b-f78f6a48af0e"
 },
"iflyos_responses": [
	{
		"header": {
			"name": "audio_player.audio_out"
		},
		"payload": {
			"type": "TTS",
			"resource_id": "Gdnj7mLrz4scKZXy6QqzR8vkv9YeieugZ6wm2DyNAv5D0VIKgACJOqyIXaEdGIRN",
			"behavior": "SERIAL",
			"metadata": {
				"text": "正在为您打开设置"
			},
			"url": "http://tts.iflyos.cn/live/79c3738c6e7e2e3abc332e4762dfc6671ec95735.mp3",
			"secure_url": "https://tts.iflyos.cn/live/79c3738c6e7e2e3abc332e4762dfc6671ec95735.mp3"
		}
	}, {
		"header": {
			"name": "interceptor.custom"
		},
		"payload": {
			"headerName": "system.open.setting",
			"data": {
				"appName": "设置"
			}
		}
	}
]
}
解析自定义技能指令 “system.open.setting” 并执行打开设置操作,通过自定义技能执行打开第三方应用技能完成。
# Android 设备端基于 EVS SDK 的 ShowCore 自定义技能实现
设备端 ShowCore 代码需要解析自定义技能下发的控制指令并执行相应操作,示例中“打开第三方应用”自定义技能识别“打开相机”的语音请求后下发控制指令,设备端 ShowCore 需要解析 iFLYOS 云端下发的 “system.open.setting” 指令并执行打设置操作。
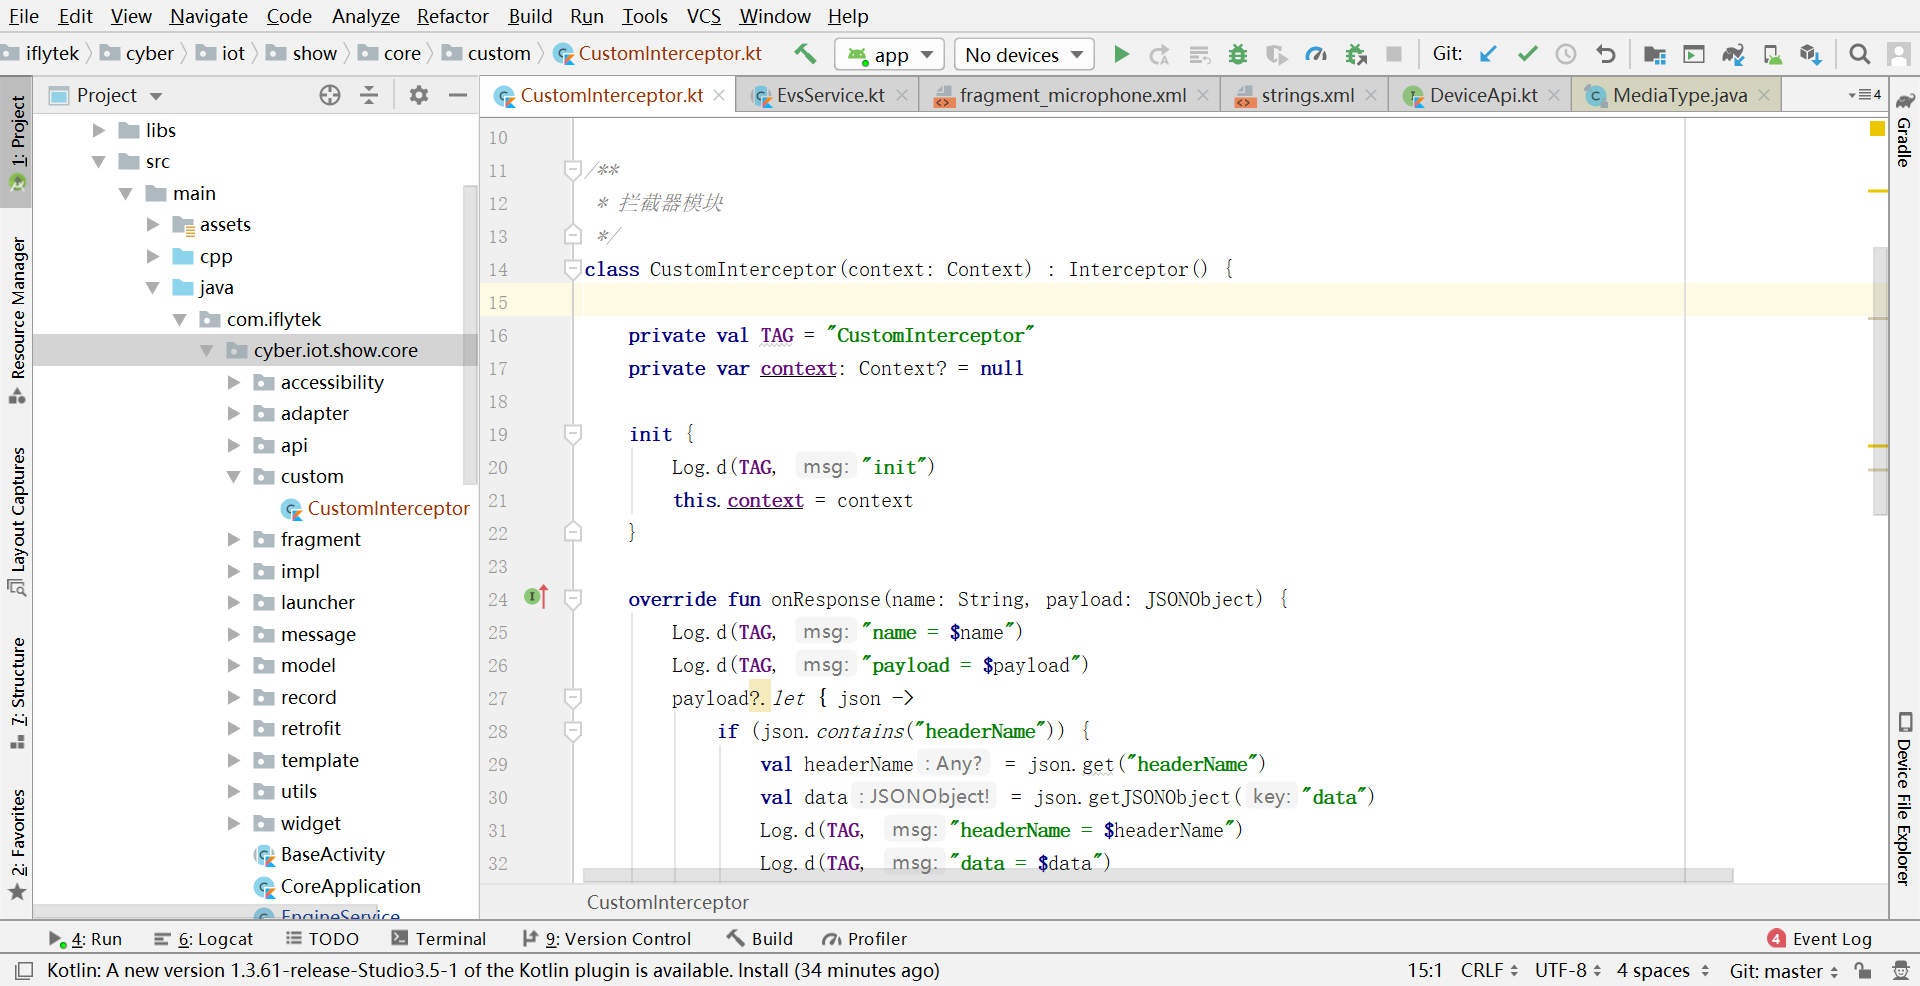
# 新建 CustomInterceptor 类
继承 interceptor 自定义拦截器,解析自定义指令,如下图所示。文本提供了 CustomInterceptor 类的示例代码;新建 custom 目录并 CustomInterceptor 放置在 custom 目录下,完整路径如下:
com.iflytek.cyber.iot.show.core.custom.CustomInterceptor
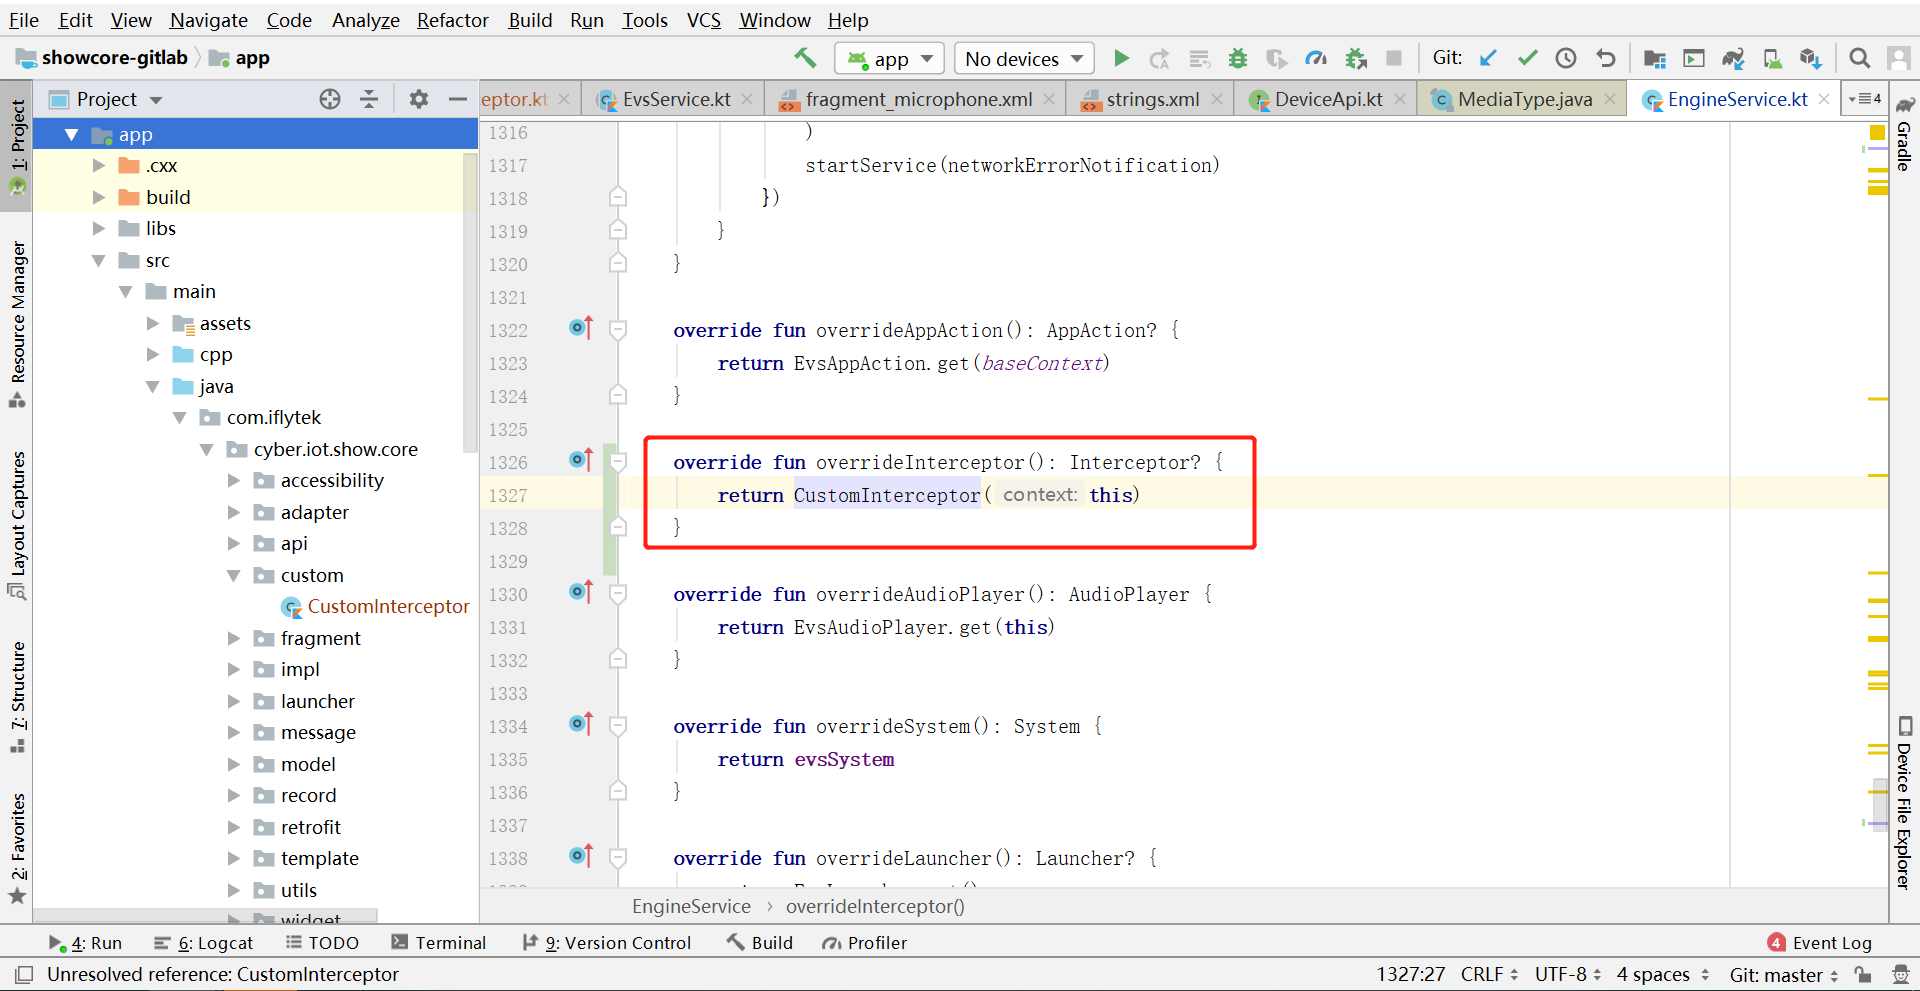
# 启动 CustomInterceptor 自定义拦截器类添加代码
override fun overrideInterceptor(): Interceptor? {
	return CustomInterceptor(this)
}
新增 CustomInterceptor 类如图示:
启动自定义拦截器类如图所示:
自定义拦截器示例 CustomInterceptor 代码:
class CustomInterceptor(context: Context) : Interceptor() {

private val TAG = "CustomInterceptor"
private var context: Context? = null

init {
    Log.d(TAG, "init")
    this.context = context
}

override fun onResponse(name: String, payload: JSONObject) {
    Log.d(TAG, "name = $name")
    Log.d(TAG, "payload = $payload")
    payload?.let { json ->
        if (json.contains("headerName")) {
            val headerName = json.get("headerName")
            val data = json.getJSONObject("data")
            Log.d(TAG, "headerName = $headerName")
            Log.d(TAG, "data = $data")
            when (headerName) {
                "system.open.camera" -> {
                    Log.d(TAG, "system.open.camera")
                    val intent = Intent(MediaStore.ACTION_IMAGE_CAPTURE)
                    intent.addFlags(Intent.FLAG_ACTIVITY_NEW_TASK)
                    context?.startActivity(intent)
                }
                "system.open.gallery" -> {
                    val intent = Intent(Intent.ACTION_VIEW)
                    intent.type = "image/*"
                    intent.addFlags(Intent.FLAG_ACTIVITY_NEW_TASK)
                    context?.startActivity(intent)
                }
                "system.open.setting" -> {
                    val intent = Intent()
                    intent.setClassName("com.android.settings", "com.android.settings.Settings")
                    intent.addFlags(Intent.FLAG_ACTIVITY_NEW_TASK)
                    context?.startActivity(intent)
                }
            }
        }
    }
}
}
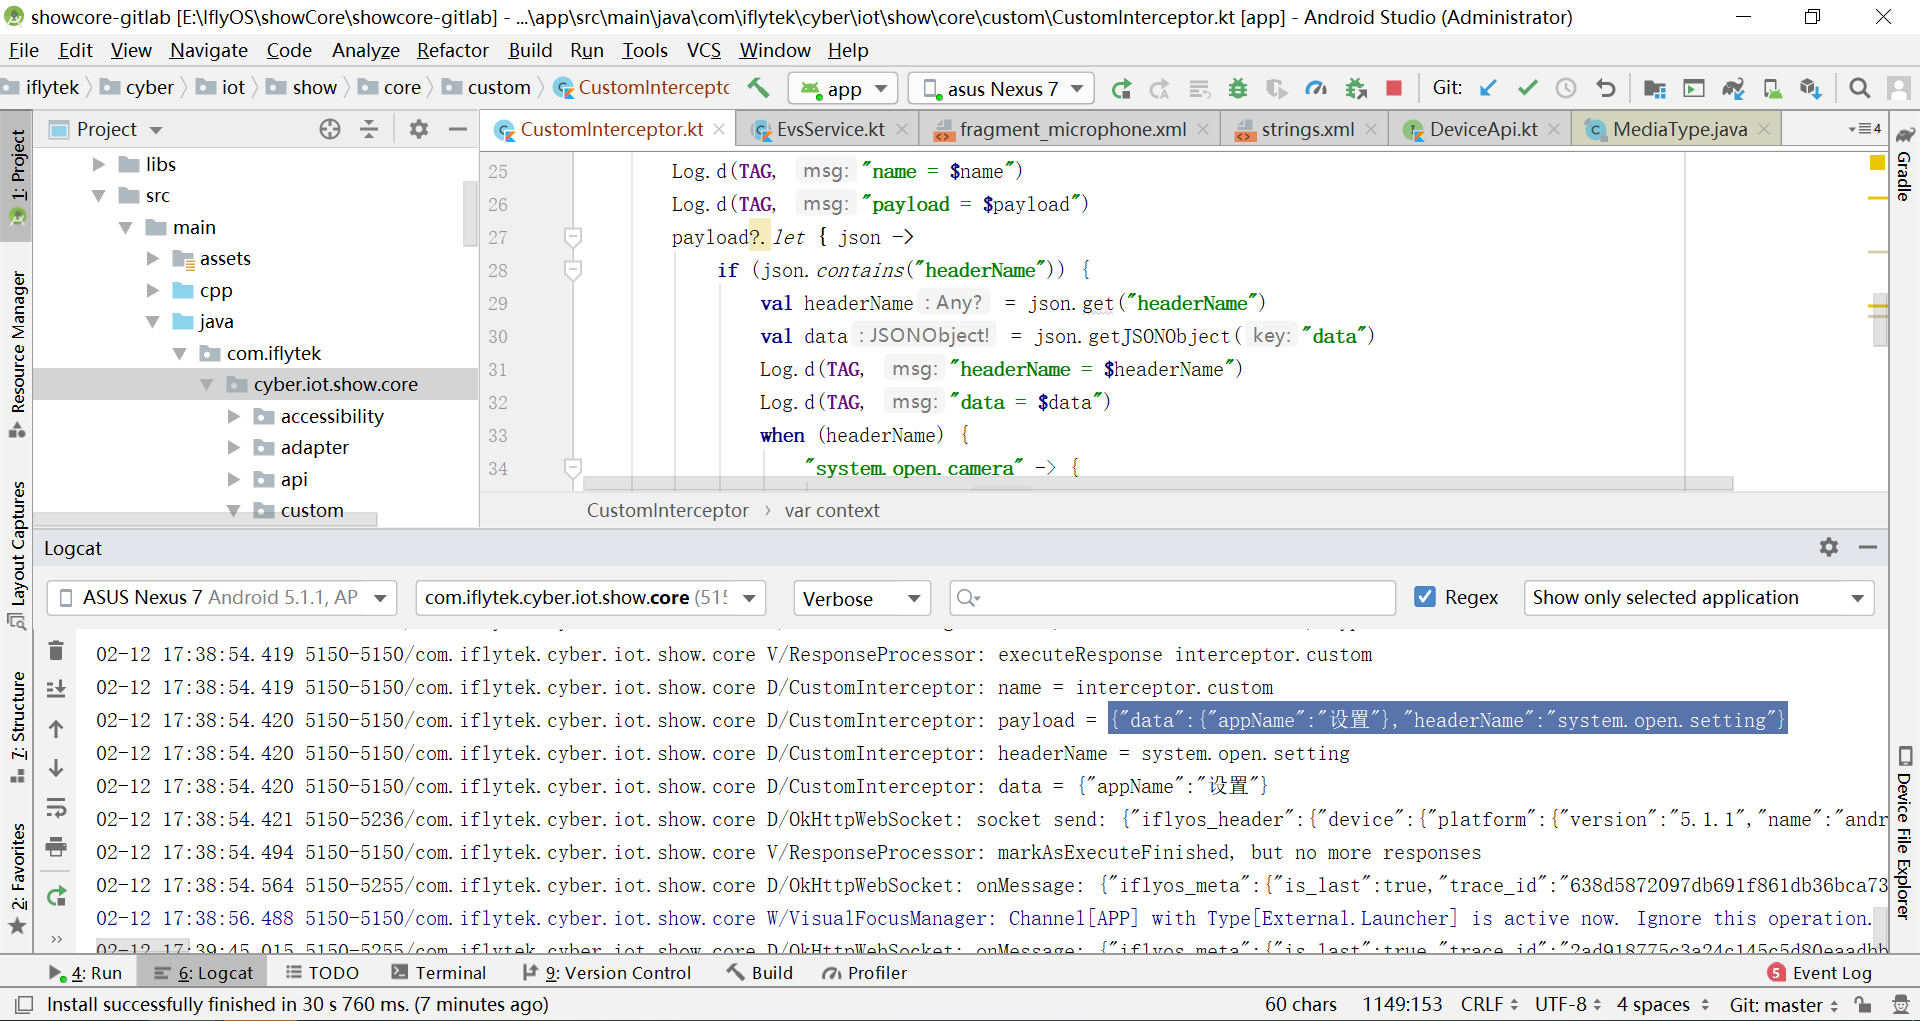
# 测试自定义技能
重新将修改后的 ShowCore 项目运行到 Android 设备上,唤醒后分别测试自定义技能语料:"打开设置"、"打开图库"、"打开相机",ShowCore 控制台 logcat 信息中可以看到解析成功的指令信息,如图4-3所示:
# linux 平台自定义技能实现
以基于 EVS WebSocket 的 Shell+Python Demo 为示例描述 Linux 平台自定义技能实现方法。
# 设备授权
环境要求:
1.Shell 环境 支持 curl
2.Shell 环境 支持 jq
如果不支持,请下载交叉编译至目标平台
在目标机器的用户启动脚本.bashrc 或者.profile 中添加如下脚本代码,让每次开机时执行,进行机器授权信息的更新
if [ -e Implicit_authorization.sh ];then
	./Implicit_authorization.sh
fi
Implicit_authorization.sh 与~/.bashrc 或者~/.profile 放置在同级目录, 给予可执行权限,并将默认shell修改至当前的shell
Implicit_authorization.sh
#!/bin/bash

echo "################################################"
echo -n "#   " && date
echo "#               Auth Start!                     "
echo "################################################"
echo ""
echo ""
###############################################
client_id=""
device_id=""

if [ $# -eq 2 ];then
	client_id=$1
	device_id=$2
fi

###############################################
access_token_file="access_token.json"
## 0. check Whether Authorization is overdue

if [ ! $client_id ] && [ ! $device_id ];then
	echo "cliend_id or device_id is null!"
	exit
fi

echo "client_id:"$client_id
echo "device_id:"$device_id

if [ -e "$access_token_file" ];then
	access_token_local_info=$(cat $access_token_file)
	ret=$(( $(echo $access_token_local_info | jq ".created_at") - $(date +%s) + $(echo $access_token_local_info | jq ".expires_in")))
	echo "################################################"
	echo -n "#   local time:" && date "+%Y-%m-%d %H:%M:%S"
	echo -n "#   created_at:" && date -d "@$(echo $access_token_local_info | jq ".created_at")" "+%Y-%m-%d %H:%M:%S"
	echo -n "#   expired_in:" && echo $(($(echo $access_token_local_info | jq ".expires_in")/3600/24)) "天"
	echo -n "#   The remaining number of days:" && echo $((ret/3600/24)) "天"
	echo "################################################"
	if [ $(($ret-24*60*60)) -gt 0 ];then
		echo "Congratunations, access token is Within the validity period!"
		exit
	else
		echo "Less than one day remaining, now fresh access token"

		url_refresh="https://auth.iflyos.cn/oauth/ivs/token"
		header_refresh="content-type:application/json"
		params_refresh="{\"grant_type\": \"refresh_token\",\"refresh_token\":$(echo $access_token_local_info | jq ".refresh_token")}"
		result_refresh=$(curl -X POST $url_refresh -H $header_refresh -d "$params_refresh")

		echo $result_refresh | jq

		if [ $(echo $result_refresh | grep access_token) ];then
		echo $result_refresh | jq ". | {token_type: .token_type, refresh_token:.refresh_token, expires_in: .expires_in, created_at:.created_at, access_token:.access_token, device_id:${device_id} }" > $access_token_file
			echo "Congratunations, access token is refreshed OK!"
			exit
		fi
	fi
fi

## 1. post new accesscode
url="https://auth.iflyos.cn/oauth/ivs/device_code"
header="'content-type:application/x-www-form-urlencoded'"
scope_data="scope_data={\"user_ivs_all\": {\"device_id\":  \"$device_id\"}}"
scope_data_urlencode=$(echo -n $scope_data | sed -e 's/\"/%22/g' -e 's/\:/%3A/g' -e 's/{/%7B/g' -e 's/\}/%7D/g' -e 's/ /%20/g' )
params="client_id=${client_id}&scope=user_ivs_all&$scope_data_urlencode"

#echo $params

commands="curl -X POST $url -H $header -d $params"
#echo $commands
echo "################################################"
echo "#      1. request device_code user_code         "
echo -n "#   " && date
echo "################################################"
ret=$(echo $(${commands} 2>/dev/null))

#ret="{\"verification_uri\":\"https://auth.iflyos.cn/oauth/device\",\"user_code\":\"129523\",\"interval\":5,\"expires_in\":120,\"device_code\":\"AB-YIIk52SnJS1awoIJJS4g2JYWawIaHgVa77a_g6OEKIYAeXNCTpuztHBaIV-RD\"}"
#echo $ret
echo $ret | jq

user_code=$(echo $ret | jq '.user_code')
device_code=$(echo $ret | jq '.device_code')
verification_uri=$(echo $ret | jq '.verification_uri')

#echo $ret | jq '.user_code'
#echo $user_code

#######################################################################################################
## 3. query result
url_query="https://auth.iflyos.cn/oauth/ivs/token"
header_query="content-type:application/json"
params_query="{\"client_id\": \"$client_id\", \"grant_type\":\"urn:ietf:params:oauth:grant-type:device_code\", \"device_code\":$device_code}"

{
	sleep 1
	echo "################################################"
	echo "#      3. query result                          "
	echo -n "#   " && date
	echo "################################################"
	for i in `seq 30`
	do
		{
			sleep 1
			result_query=$(curl -X POST $url_query -H $header_query -d "$params_query" 2>/dev/null)
			#echo "result_query:"$result_query
			echo $result_query | jq
			#echo "i:$i"
			if [ $(echo $result_query | grep access_token) ];then
				echo $result_query | jq ". | {token_type: .token_type, refresh_token:.refresh_token, expires_in: .expires_in, created_at:.created_at, access_token:.access_token, device_id:${device_id} }" > $access_token_file
				exit
			fi
		}
	done
}&

#######################################################################################################
## 2. Implicit authorization

url_implicit_auth="https://api.iflyos.cn/thirdparty/watch/auth"
header_implicit_auth="content-type:application/json"
#params_second="{\"thirdparty_id\":\"$client_id\",\"user_code\":\"129523\"}"
params_second="{\"thirdparty_id\":\"$device_id\",\"user_code\":$user_code}"

echo "#########################################"
echo "#      2. Implicit authorization         "
echo "#               start                    "
echo -n "#   " && date
echo "#########################################"

#result_implicit_auth=$(curl -X POST $url_implicit_auth -H $header_implicit_auth -d "$params_second")
result_implicit_auth=$(curl -X POST $url_implicit_auth -H $header_implicit_auth -d "$params_second" 2>/dev/null)

echo "#########################################"
echo "#      2. Implicit authorization         "
echo "#              result                    "
echo -n "#      " && echo $result_implicit_auth
echo "#########################################"
#$commands_user_auth
#${echo $commands_user_auth}
#result_implicit_auth=$(echo $(${commands_user_auth} ))
#echo $result_implicit_auth | jq

wait  ##等待所有子后台进程结束
echo "############################################"
echo -n "#   " && date
echo "#               Auth End!                   "
echo "############################################"
授权成功后会在当前目录生成access_token.json
{
  "token_type": "bearer",
  "refresh_token": "THIRDPARTY_f71L3mu2K2aOubwORiqaRRS7M9vlG1zBtIKgVoUhAyERLOSP6NlFwR9lzGsymC7I",
  "expires_in": 8640000,
  "created_at": 1583155505,
  "access_token": "THIRDPARTY_oHNaTIK8KP9A-zcKp4lUtS43r4m1TgR5YPDZ_e_EHKdCOhLDNhfsQucO0hgr0g-y",
  "device_id": xxx
}
# 建立 EVS 连接
设备端通过 EVS 协议与 iFLYOS 云端建立 WebSocket 连接:
self.ws = create_connection(base_url + "?token=" + access_token + "&device_id=" + device_id)
# 设备端发送语音/文本请求
向云端发送语音请求:
def sendRequest(self):
        data = {'iflyos_header':{'authorization':'Bearer '  + access_token,
         'device':{'device_id': device_id, 'ip': '192.168.1.1',
         'location':{'latitude':81.56481, 'longitude':22.36549},
         'platform':{'name':'Linux', 'version': '8.1'}
                                          }},
    'iflyos_context': { 'system': { 'version' : '1.0'},
      'recognizer': { 'version' : '1.0'},
      'speaker': { 'version': '1.0', 'volume': 10, 'type': 'percent'},
             'audio_player': { 'version': '1.0', 'playback':{'state':'PLAYING'}},
                    },
     'iflyos_request': { 'header': {
                   'name': 'recognizer.audio_in',
                   'request_id': '6666'},
                   'payload': { 'reply_key': 'xxxxxx',
                      'enable_vad': 'true',
                      'profile': 'CLOSE_TALK',
                      'format': 'AUDIO_L16_RATE_16000_CHANNELS_1',
                      'iflyos_wake_up': {
                        'score': 666,
                        'start_index_in_samples': 50,
                        'end_index_in_samples': 150,
                        'word': '蓝小飞',
                        'prompt': '我在'
                                                  }}
                                                  }
                }
        #print str(data)
        jsondata = json.dumps(data)
        print jsondata
        self.ws.send(str(jsondata))
向云端发送音频:
def send(self, file_path):
    file_object = open(file_path, 'rb')
    try:
    index = 1
        while True:
        chunk = file_object.read(640)
            #chunk = file_object.read(1280)
            if not chunk:
            break
            #.send_binary
            if index == 1:
            print type(chunk)
            self.ws.send_binary(chunk)
            index += 1
            time.sleep(0.04)
     finally:
     #print str(index) + ", read len:" + str(len(chunk)) + ", file tell:" + str(file_object.tell())
     file_object.close()
         self.ws.send(bytes(end_tag))
         print "send end tag success"
开发者也可以向云端发送文本请求来实现,实现示例如下:
向云端发文本请求:
def sendTextRequest(self, text):
        data = {'iflyos_header': {'authorization': 'Bearer ' + access_token,
             'device': {'device_id': device_id, 'ip': '192.168.1.1',
             'location': {'latitude': 81.56481, 'longitude': 22.36549},
              'platform': {'name': 'Linux', 'version': '8.1'}
            }},
       'iflyos_context': {'system': {'version': '1.0'},
         'recognizer': {'version': '1.0'},
       'speaker': {'version': '1.0', 'volume': 10, 'type': 'percent'},
          'audio_player': {'version': '1.0', 'playback': {'state': 'PLAYING'}},
            },
            'iflyos_request': {'header': {
                    'name': 'recognizer.text_in',
                    'request_id': '6666'},
            'payload': {'reply_key': 'xxxxxx',
                        'query': text,
                        'with_tts': True,
                        'iflyos_wake_up': {
                            'score': 666,
                            'start_index_in_samples': 50,
                            'end_index_in_samples': 150,
                            'word': '蓝小飞',
                            'prompt': '我在'
                        }}
        }
        }
        # print str(data)
        jsondata = json.dumps(data)
        print jsondata
        self.ws.send(str(jsondata))
# Linux 平台解析 iFLYOS 云端下发自定义技能指令并执行操作
以打开微信为示例,Linux 平台解析 “system.open.wechat” 自定义技能指令并调用 Shell 脚本进行应用窗体和进程的管理,示例代码如下:
def parse_result(self, result):
    print u'%s' % result
    self.tparse = threading.Thread(target=self.parse_result_subThread, args=(result, ))
    self.tparse.start()
def parse_result_subThread(self, result):
    result_dict = json.loads(result)
    try:
       for i in result_dict.get('iflyos_responses'):
           if i.get('header').get('name') == 'audio_player.audio_out':
               url = i.get('payload').get('secure_url')
               # 播放TTS提示音
               os.system('curl -L %s | ffplay -nodisp -autoexit - &' % url)
           elif i.get('header').get('name') == 'interceptor.custom':
               intent = i.get('payload').get('headerName')
               if intent == 'system.open.wechat':
                   slots = i.get('payload').get('data').get('contact')
                   if slots == u'微信':
                      # 打开微信
                      os.system('./shell/system_open %s &'%'wechat')
     except Exception as err:
     print 'parse_result err: %s!'%err